
Hi, Adobe!
Note: clicking any image below makes it larger in a new window.
If you visit here regularly, you've probably noticed that I post a lot of High Dynamic Range, or HDR, stuff these days. Even if you don't, you've likely seen HDR photos all around the net as photographers both pro and hobbyist experiment with this emerging artistic format. Personally, I was pointed to it earlier this year by a fellow photographer & friend, Darren, and I've been having a ton of fun with it since.
However, I've noticed as I look around that most of the other photographers out there who work with HDR are creating images that, while often extremely interesting, look absoloutely nothing at all like the scene they were shooting -- and even if they do get it close, they end up with photos that have an enormous amount of HDR processing artifacts, such as halos. The reason for this is a popular program known as Photomatix. Photomatix is actually a very competent HDR assembler, but it's tone mapping functions tend to look a bit on the silly side. At least in my opinion.
I've come to believe that there are few things in the digital photography world that Photoshop can't do better than most other programs. HDR turns out to be one of them. Photoshop CS2 has a little-known (it seems) built-in HDR assembler that, while lacking the "make my photo look like a bucket of saturated paints gone awry" tone-mapping features of Photomatix, is capable of creating extremely realistic or extremely surreal HDR images.
I've been using Photoshop CS2 for most of my HDR images, and lots of people have been asking me what I do and how I do it. Wonder no more! It's actually pretty easy. Let's get started. :)
What you need:
1. A digital camera that allows you to set exposure manually.
2. A sturdy tripod.
3. A subject (i.e., what you're taking the picture of) that does not move.
4. A computer with Photoshop CS2 installed.
If you have a camera that supports it, it also helps to have a "cable release", which is basically a little shutter button that attaches to your camera via a wire, so when you push the button to take the picture, you don't nudge the camera at all.
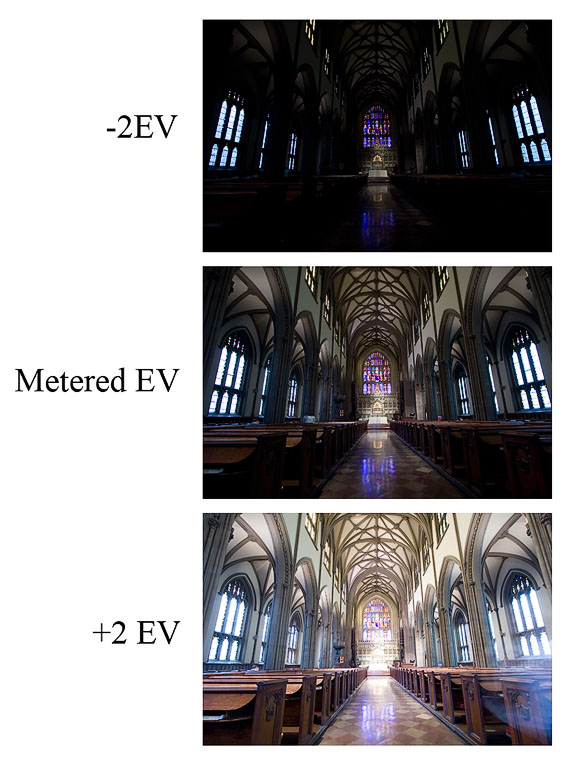
First off, you need to take the photographs. Because you are attempting to create a high-dynamic-range image, it makes a very good deal of sense for you to set your camera so that it shoots your photographs in your camera's RAW mode. The reason for this is that the RAW format captures more dynamic range data than is available in the alternative, the JPEG file. It also gives you a great deal of color temperature latitude -- you can set the color temperature of all of your photos very easily after the fact. You also need to set the camera to manual exposure mode. Tripod your camera so that it doesn't move, then compose the scene you want to shoot. Note that, like long-exposure photography, HDR works best when your subject isn't moving. Also, if your camera has a changeable ISO setting (most do), set it as low as possible to avoid noise. Meter your scene. Select the aperature you wish. The object here is to bracket your photos (i.e., take a photo of the same scene several times with different shutter speeds), either automatically or manually. Some high-end cameras bracket automatically, some don't. It's important that you change the shutter speed, NOT the aperature -- the reason being that since you will be combining several images to make one, you don't want your DOF to change between shots. Once you have your scene set, your camera set and tripoded, and your settings set -- take your pictures. I personally usually like to take quite a few photos over the range -- for example, I'll take photos at -6EV, -4EV, -2EV, metered EV, +2EV, +4EV, and +6EV. That may seem like a bit much, but going overboard doesn't hurt anything and gives you more latitude in toning. However, you can get by with less, as I have in the below example:
Okay, so you have your three (or more) photos! Transfer them from your camera onto your computer. Done? Done. Now, how do you take those three photos and create a new, magical HDR image? Simple.
First, find your three photos either using Windows explorer or the Adobe Bridge program that comes with CS2.

Highlight them, and open them with Photoshop at the same time by dragging them into Photoshop.

Okay, you've got it open. The important things to do here are to
A: make sure that all three photos are the same color temperture and tint
B: make sure that you turn off ALL the automatic checkboxes.
You can pick any color temperature you think looks like what you saw -- the important thing is that they're all the same. Done? Now click "Done". By clicking done, you are telling Photoshop to remember these settings -- which is important, because in a moment you're going to have Photoshop automatically open all of these photos up again.
Okay, now to make the HDR. Go into the File menu, then the Automate submenu, then select "Merge to HDR":

In the dialog box the pops up, select the files you want to use to make the HDR. Do not check the "Align automatically" box, unless you screwed up your tripoding and moved the camera between photos. The automatic alignment feature doesn't usually work so great, so it's really a last resort.

You will end up with a preview window that shows you a preview of your HDR that looks like this:

Just click okay -- you don't need to adjust the histogram up there at all, all that effects is the preview, it has no effect on the final image. (*edit*, okay, it DOES affect the baseline for the curves in the next step but for all practical purposes it doesn't matter for what we're trying to do. Thanks to Adobe for pointing this out to me.) After a loooong while (or a short while if you have a fast computer and a lot of RAM), it'll finish and show you your new HDR image. Cool! You can save this file if you want; it's a 32 bit image file that contains all the exposure data from all of your shots. Doesn't look like much, but that's because you don't have an HDR monitor. One day, HDR monitors will be commonplace -- so keep that file handy. :)
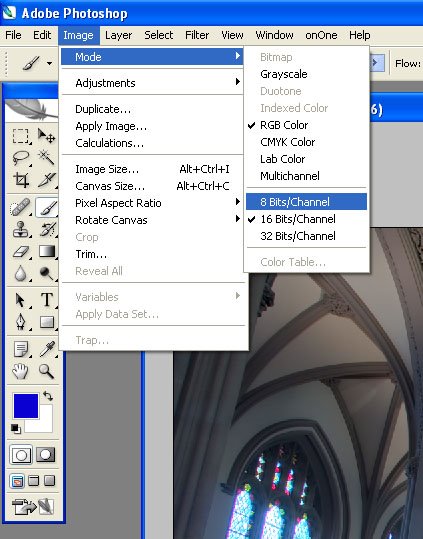
But wait, we're not done yet! We want the photo to look good on our monitor. How do we do that? Easy, we downsample. Go to the Image menu, the mode submenu, and select "16 bits per channel".

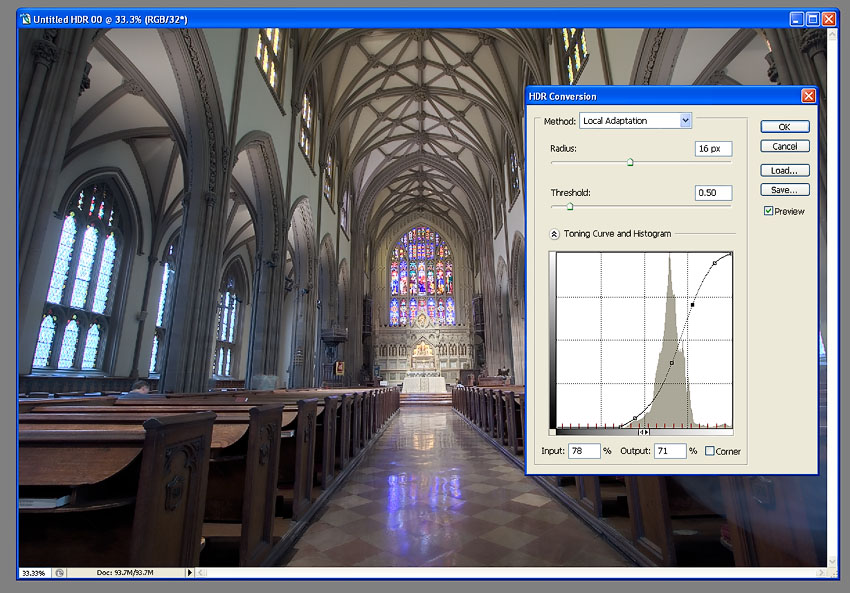
You end up with a new menu. Toggle the Histogram arrow at the bottom to show the histogram. Go into the little menu at to and select "Local Adaptation":

Click OK. Whoa! Crazy, huh? Doesn't look so great, most likely. This is just the preview window, though, showing you what it will probably look like when Photoshop is done converting it. The first thing you need to do is bring the left hand side of the histogram to the beginning of the shadows information, as shown below:

Okay, cool! Looks better. Now work the curves until you're happy. If you don't know how to use curves in Photoshop, wikipedia or a search engine is your friend. :) Here's what I did to this one:
When you're done, click okay. After a little while, viola! You get a nice 16 bit image. Tone this to your taste using whatever toning tools you know. Save it as a 16bit TIFF file, if you like. However, when you're done, you need to downconvert it to 8-bit in order to save it as a JPEG. Go to the Image menu, the mode submenu, and select "8 bits per channel".
Viola^H^H^H^H^H Voila, the finished product has arrived!
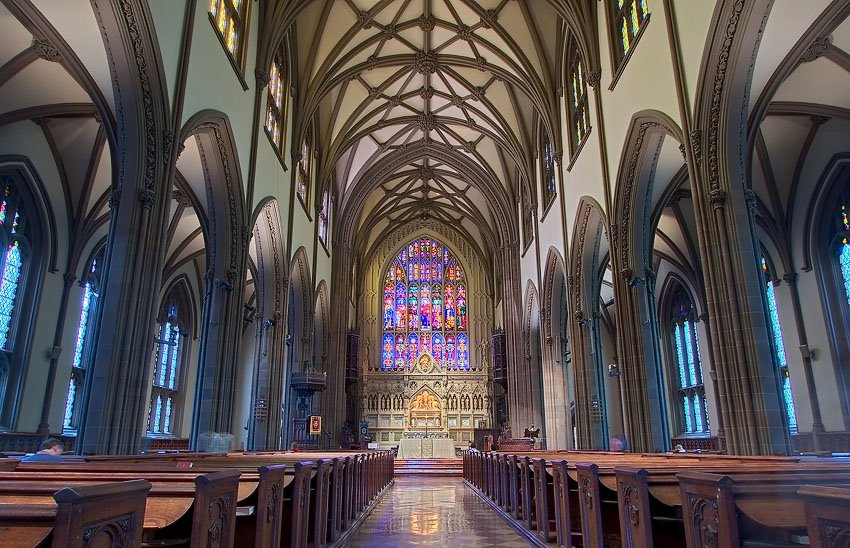
Save it as a Jpeg and you're done. See, not too hard -- and it's a great new world of photography to explore.
BTW, in the near future I'm going to post a tutorial about just what I meant by "use your own toning skills". Digitally toning (i.e. color correcting) a photograph is quite a process, but most of the interesting stuff about it is easy to digest and learn, and can often be done quickly once you're practiced.
336 comments:
1 – 200 of 336 Newer› Newest»Can't wait to try this out.
Great post. I found this on reddit.
Is there a web solution that would allow me to view this in HDR format or a "HD" type supported format?
Well, if you happen to own a $50,000 HDR monitor, you probably can view this in HDR if I made a copy of the image available in it's native 32bit mode. Of course, 32 bit images of normal 8 megapixel size are like 90MB large... :)
Thank you Ryan. I hd tried HDR before, but did it all wrong by trying to get the image right too early. Thanks for your tutorial, now I know how to do it. A suggestion: I tried direct import of the RAW files, and import of the TIFFS translated via Adobe Lightroom with a constant regulation of colour temperature (all the rest was zero). The TIFF files worked much better, I believe due to superior translation of Lightroom. I also found that curve adjusting is better done in Photoshop after the translation to 16 bit.
Fabio
Terrific article -- thanks. I will have to sell a kidney or some such so I can afford CS -- I made do with Elements at the moment.
Excellent post, what sort of camera would you need to produce these results? what camera did you use for this example?
That's awesome. I have used PSCS2's HDR option before, but never downsampled to make it look good. I guess I just expected PSCS2 to make it look good all by itself!
Thanks!
Viola?
Shouldn't be the frency "voilà"?
All this work for an HDR so that you can downsample to 8 bits and save as a lossy JPEG? Is this a joke?
Great post! You've been Dugg, son.
Unless this post is only meant for my friend Viola, you mean "voilà".
Thanks alot dude, that's very interesting!
Found this blog through this Digg post just now.
Very nice. That is a great photo. What building is that?
That's what I get for not reading the previous blog posts... it's the Manhattan Church. :P
I have to say I disagree with your assessment of Photomatix. My photos photos are all done with Photomatix and come out quite realistically. You're right that many people take HDR to the extreme and their results are cartoony, but with practice and an artistic eye, the results can be great! In my experience with HDR images in Photoshop CS2, the results are much grainier and dull than with Photomatix. Thanks for the post!
You can always try photomatix
Thanks for all the information Ryan! I can't wait to use it!
thankyou!!!
Matt
Thank you for taking the time to put this together. I've been wondering how to go about doing this for a while and like so many other things, just haven't gotten around to looking up.
It's "voilà", not "viola. Viola is an instrument. ;)
Nice tutorial.
For those who don't have a "cable release" an alternative is to use the "timer release" on your camera.
Thanks for this post, really helpful
Great post. Thanks!
You don't need a HDR monitor to make use out of these types of images.
For folks who do any 3D work, HDRI are used to light scenes. Either directly or complementing an existing light setup.
Outstanding post for those interested in the creation of their own images for this type of use. :)
also check out HDRshop for assembling and viewing HDR images. Its free, easy, and works great, but doesnt have as many tone mapping features. Ive been using it for a few years now when creating HDR light probes for 3D renderings. It also support Paul Debevec, one of the HDR pioneers..
great write up btw.
-unparent.com
which digital camera would you say is the best for HDR images? im looking to get a bew camera and ideally if their is such a beast one that shoots images in HDR for you if thats possible
nice post. BTW it's voila not viola (wich means "raped" in french)
Hey nice man!
Hi! I used a Canon EOS 20D for that sample shot (and all my digital shots, really). For the sample shot, I used a Canon EF-S 10-22 lens. I highly reccomend this lens; it's been one of the best purchases I've ever made.
Tell you what -- if you can find photographic paper that can render 40 stops of light information, I won't downsample. :) I suspect you don't really have a lot of experience with photography.
For the most part, any digital camera that allows manual adjustment of settings and will mount on a tripod will work for taking HDR photos. If you can afford it, it's best to get a camera that has "auto exposure bracketing" and has a port for a cable release. I think there's even a Nikon model out there that will take up to 7 bracketed photos in a burst -- and while I'm a huge Canon fan, Canon currently offers nothing like that. The most shots a Canon will bracket in a burst is 3.
Ryan - great post. I am in the market for a new camera.. how much is the lens you used on this camera? What type of lens is it? I am trying to decide between the rebel XT, EOS 20D, Nikon D80, and Nikon D70. All seem to be pretty great cameras. Any advice? Thx
Can this process be used when only shooting a single RAW file (and then converting several exposures of that later)?
Thank you Thank you Thank you.
I'm so glad that someone finally posted an article that just says what all of the photographers have been thinking regarding a lot of the HDR stuff that's out there.
I'm pretty tired of seeing these immaculately haloed creations that look more like cartoons than what you'd see. My least favorite effect is the tendency of photomatix users to make people look like porcelain dolls... gives me the heebs.
again,
THANK YOU
No, the process really doesn't make much sense with a RAW file. I think Photomatix will allow you to tone-map RAW files, but all you're really doing then is giving your normal photo that comical Photomatix "look". Photoshop won't let you do it at all. In reality, the point of HDR is to capture more dynamic range information than can be displayed on a normal screen at one time. The only way to do this, short of buying a $40,000 medium format digital back, is through taking multiple exposures.
If you want to do a tone-mapping type thing to a single RAW file with Photoshop CS2, try using the "Shadows and Highlights" tool once you have the RAW file converted and opened in photoshop. If you're really photoshop savvy, you can also open the RAW file in several different exposure values and then compost them with layers in a single file. Kinda like dark-room masking, only with Photoshop.
Richie - sorry, but I have to disagree. Less cartoony than the vast majority of Photomatix results, but still not realistic.
I am hoping HDR will be moot pretty soon. Theoretically with a digital camera they can make a camera where EACH pixel is exposed and shuttered individually. Giving you essentially perfect dynamic range. we just need someone to invent this in a practical manner :-) every HDR shot I have seen so far is simple stunning !! I never dreamed of doing it this way. in the past I would shoot one for land once for sky and "merge" them in photoshop something which I was never overly adept at. they looked MUCH better than either seperate image but you could tell they were "put" together. These shots are simply stunning !! I can not wait to start playing with this software. Going to do some shooting this weekend!
all that clumsy work can be avoided by buying Phase One digital back (used, on eBay for example). It has more dynamic range than classic color slides and puts all digi SLR's on shame. Click and that's it.
Dagg
真奇妙。
长知识了,我也学学。
Thanks for the post. It looks great and I will certainly give this a try the next time I'm out taking photos with my tripod. I am forever impressed with Photoshop! Keep up the great work.
I've gotta disagree. Sure your example shows a nicely blended result but its got no pop, no whoa. You couldn't do this or this with Photoshop. I'm one of those people that doesn't care about the method only the result. I've made a tutorial using Photomatix that does a good job about how to avoid the pitfalls you mentioned. You could easily generate the shot you produced using Photomatix and get "professional" results.
You've got a minor grammatical/usage error that changes the whole sense of your statement here:
I've come to believe that there are few things in the digital photography world that Photoshop can't do better than most other programs. HDR turns out to be one of them. Photoshop CS2...
This bit makes it sound like Photoshop CS2 is NOT good at this -- what you want is something like, "HDR turns out NOT to be one of them..." or "HDR isn't one of them...", the sense being that HDR is YET ANOTHER thing that CS2 does well.
Sorry, just that i know if it were me i'd hate to have an archived post around for eons with a minor error like that! Hope you don't mind...
Now I just need to run over and steal back my camera from my cousin before he sees this post and starts playing with it himself....
Great post!
*runs out door*
Great post, I deff need to try this out!
God bless,
-en3r0
A very interesting tutorial. Many thanks !!
Pete Carr wrote: I've gotta disagree. Sure your example shows a nicely blended result but its got no pop, no whoa. You couldn't do this or this with Photoshop. I'm one of those people that doesn't care about the method only the result. I've made a tutorial using Photomatix that does a good job about how to avoid the pitfalls you mentioned. You could easily generate the shot you produced using Photomatix and get "professional" results.
Hi, Pete! While I respect your opinion, you have to understand that to me, the examples that you use look... well, pretty stupid. Dramtically overprocessed without an eye for detail, completely unrealistic without point. This is exactly what I'm trying to avoid by using Photoshop. Granted, I can understand that some might prefer their photos to look the way you've demonstrated, but I don't. I think they're pointless and faddish and are more a reflection of a computer's algorithmic interpretation than an artistic interpretation. My LDR downsamples of HDR photos may not look like an impressionist's nightmare, but I am pleased with how they've come out.
By the way, Pete -- I just noticed while reading your tutorial that you aren't even working with HDR images, you're Photomatix-filtering Jpegs. Either you didn't read my article, or you really aren't comprehending just what "HDR" means.
Very nice Ryan, I didn't even know my camera could do bracketing (or what bracketing meant) until I read this tutorial. I just wish I could afford that 47k BrightSide display to view these images in their full glory.
Pertaining the the photoshop portion of the tutorial, how does one pull up the dialog box used to set all photos to the same color temperature and tint? It appears that this is upon opening the photos, however on my computer, the files simply open in CS2. Thank you for any assistance.
Sorry, I didn't mean to cause any offence. For the record, if you had properly read *my* article :p I'm using 16bit Tiff's generated from RAW files, not Jpegs. There has been lots of discussion online about what HDR truely is. I honestly don't care. Its all about the end result. I've ran tests and using my methods there was no real difference between a "true" HDR shot and the way I do things. Using my guide you can achieve results like yours if you wish or you can be creative. The whole point of my guide was to demonstrate various ways to allow artistic interpretation.
While I respect your opinion, you have to understand that to me, the examples that you use look... well, pretty stupid. Dramtically overprocessed without an eye for detail, completely unrealistic without point...
I think they're pointless and faddish and are more a reflection of a computer's algorithmic interpretation than an artistic interpretation.
Don't hold back at all ;) Just for the record, I currently have 5 of my HDR shots in galleries around Liverpool, UK. I also have interest from a gallery in Italy. I think you'll find that my images have plenty of artistic interpretation.
Hi, Peter! Don't worry, no offence taken -- I just disagree with you. Since you think there is no difference between what you are doing, in creating HDRs from a single RAW with 12 bits of color data, and, say assembling a 32bit file from 20+ stops of information, it would appear that you simply don't understand what it is that you are doing. It's not that there is no difference between "real" HDR and the "pretend" HDR you are doing, it's just that you don't understand it. And, as you said, you don't really care enough to take the time to figure it out.
I'm not saying what you're doing isn't interesting, even if I don't particuarly care for it -- it's just that it's not HDR photography.
Hey Ryan. Phew, thats ok :) I know there are a lot of people out there who are very very strict about HDR photography. Whether mine is true HDR or just higher than LDR I don't really know and I'm not really fussed :) I'm in it for the result and its a technique that allows me to be creative. I'm in it for the art not the tech specs :) So far I've had a lot of support for my work, from galleries, artists, and magazines. Its a bit upsetting when someone calls them stupid, but hey its the net and everyone is allowed free speech and it is your site after all. I do like your photo but I'm a big fan of really bold images and thats what my "HDR" technique allows me to achieve.
Oh I forgot to say, yes those shots you linked to are OTT and bad HDR images imho. One of the reasons I did my guide was to hopefully teach people how to avoid such images.
Cool! Can you do this (or fake it) with older version of Photoshop?
Hi,
i have the same problem as Mark, i can't find how to set all photos to the same color temperature/tint...
Please help
Hi! It's not too hard -- all you have to do is select all of the images you want to use in the HDR in Windows explorer and then drag all three of then at the same time into Photoshop. Photoshop will give you the RAW files in a preview window, with the files as thumbnails on the left-hand side and the RAW file you're currently working on on the right. To quickly change all the color temperatures at the same time, select one of the RAW files on the left, press CTRL+A to select all of them, then go over to the setting on the right and punch in whatever temperature and tint you want.
Note that this only works with RAW files -- you can't do this with JPEGs or TIFFs. Another great reason to shoot RAW! :)
Hi all.
I'm pretty new at this HDR and I'm trying to jump on it.
(thank you for being dugged, because without your post, I would never know or learn this method and wanting to try it out)
First and foremost, Do I need a $2000 camera before I try this?
All I have is the dsc-n1 that I just bought recently.
If there's a book, or a tutorial that I Can read more about this technique, I would be greatly appriciate it!
Thank you again!
If there's no such book, maybe Ryan can make one :)
Great explanation of HDR and it's techniques. on another blog, I questioned if you could do (as they stated) whether you could do HDR with just a single shot on RAW. Well, of course not. Can't wait to try this technique.
I own a Digital Rebel not the XT model, and for someone not "into" photography I like it better, just becaose of the nice big pistol grip. The XT is quite a bit smaller in the hand. Mine is 6.4mp. I agree the stock lenses are plastic, light and low quality though.
Now, a question about HDR photography. I'm in the adult entertainment industry, can this apply to a photo of a model? I guess the only way is to take one photo of the model, and then many more of the background without the model in it?
Or perhaps three cameras stacked on top of each other linked to shoot at the exact same time? That even possible? :)
Gotta say I like those new 39mp cameras, some sites are already using them, offering 6000x4000 images in some cases.
In your example HDR is great for static subject matter, shooting above and below the EV reading. What about taking a Raw file, converting it above, below, and at correct exposure, and then creating an HDR image out of those 3 images? Then you could created HDR images from moving subjects, people, etc...
Ryan,
It is great that you and Pete are both such advocates of your methods! Both make interesting ways of extending our artwork. Thank you both for sharing!.
WOW. Very good tutorial.
I found this at
http://thephotostation.net/forums/showthread.php?p=114586#post114586
I am not a big fan of PS' HDR. Most the time the results look unnatural to me. For instance, in the example given in this blog, the blues in the stained glass is too saturated and dark. I find that often I can create a more convincing composite by working manually with layers, often in less time than it does to tweak HDR. The other problem with HDR is that if there is a slightest difference between the images, HDR will create very visible artifacts.
To qualify my previous post, I sometimes use HDR in images where there is a complex mix of dynamic ranges which would make layers work too time consuming.
That's definately true, QT! HDR has its limitations, that's for sure. I, too, also do a lot of layer-masking work; it's actually the method that I prefer for most shots. But there are some shots where HDR really, really works.
I think that the look of HDR downsampled images will improve dramatically over the next few years as software companies refine their tone-mapping functions.
hi, I have a question: what is the "use" about HDR image? (for what)
Is it possible to get a true 32bits image copy?
Not too sure what you mean by "EV" and how this is set. Could you explain?
"Tell you what -- if you can find photographic paper that can render 40 stops of light information, I won't downsample. :) I suspect you don't really have a lot of experience with photography."
My thoughts exactly... prolly some "Know It all" Point and shoot weekend warrior...lol STFU moron..
Great post!!! Is too easy to make a good HDR image with your steps. Thank you!
Great info here...nice post and I couldn't agree more with some of your comments about the influx of HDR images and how they can often appear unnatural. (Now, if I could have someone give me info on how to obtain CS2 on the cheap, me and my Nikon D70 would be off to the races. I wouldn't expect anyone to post that info online but email me at beatty@shaw.ca if you have any ideas...) :)
Wow, finally i have finded i nice tutorial for made my own hdr pictures
Great tutorial. I'm new to HDR and have gotten some great results but although I start with 300dpi images they always end up at 72 and print out looking bad. Any thoughts on this or am I screwing up somewhere in the process?
Great Tute, dude. Thank you. I will try this out next weekend. I found you via del.icio.us.
First things first, thanks Ryan for an informative tutorial on HDR. This is an interesting area of photography and you've done a good job explaining your techniques. While I prefer the subtler effects your approach produces compared to those espoused by Pete, I think you were a bit harsh in your response to his comments.
There is another approach I read about recently that I've been meaning to try out. It results in more realistic photos as well:
http://www.tofahrn-foto.de/index.php?lg=en&pg=tipps.dri
Ryan, I find the example photo to be flat and utterly boring looking. It looks like a technically perfect, soul-less redendering.
Pete, your examples are garish and over the top.
HDR is nothing new; photogs have been compressing the range of their images to squeeze as much as possible into the precious few stops of their paper since the art of photography began. Many old photos with that beautiful "glow" are a direct result of this - however, the effect is but a facet of the image, not the overriding theme, such as the examples put forth on this site.
Using a technique for the sake of using it usually results in the creation of stunning examples of that technique, but otherwise unmemorable images.
Found this from googling hdr photo tutorial or something like that, nice writeup thanks man.
Why thank you Captain Anonymous. Isn't art fun kids.
heya, great tutoprial. i found it just before i went away for the weekend. i discovered something i didnt really think about while reading it though. you cant really use it on the ocean, or during high wind/cloudy days, as both the clouds and the ocean move too much between frames. a shame really as the weekend i went away to test it was a stormy, windy day by the ocean.
Wonderful article.
You explained it to the letter, and all is left to do - it just do it.
Thank you :)
Gilad Benari
Thx to both Ryan and Pete for two very useful guides.
Anyone know if this technique will work with JPG images? It seems to me that it should, but I'm curious if anyone has done it.
Thanks,
Tim
www.pbase.com/tim32225
Hey man I would like to thank you very much with your help I created this:
http://www.deviantart.com/deviation/43941729/
HDR Panaramic view from my rooftop of the Philly skyline. So again, thank you very much for the tip :)
so i just have to use RAW format for HDR?
I am used to clicking my images in JPEG ... i think i have to change that! :) thanks for the tutorial!
Great post Ryan - have already had some good results following your tutorial.
What tone mapping tool do you use?
Hey. I found this tutorial by googling and I just want you to know that you really kicked me forward on this subject and I just can't keep testing this over and over again on different scenes :D
You cleared things up for me. Many things.
great tutorial, thank you
Hi...Very nice tutorial!! :) But - you mention that I should use any "toning tools" that i prefer. Can you mention a few? I don't know any... I am quite new to HDR
Thanks for this. Excellent Tutorial. Very much agree on Photomatix. It simply overcooks otherwise fine images!
Best
Brian
I haven't processed any HDR images yet but I've been looking at examples and reading advice on the technique. It seems to me that all examples, whether PS, Photomatix or whatever look either artificial (which is OK if that is what the owners want)or very flat.
I think the reason for the flatness is the inverse square law: the amount of light received at any point is inversely proportional to the distance of that point from where the light is transmitted. This is why distant views look duller than close-ups.
However, the way things look is nothing like the inverse square law suggests. Consider two objects 10m and 100m away: the inverse square law says the far object will be only 1/100th as bright as the near object, and something 1000m away will be only 1/10,000th as bright.
When our eyes were evolving, if they just went with the inverse square law,things more than a few metres away would be too dim to see: no good if hunting and dangerous if being hunted. I think this is why our eyes developed with a non-linear response, close to a gamma of 2.2.
The inverse square law is equivalent to a gamma of 2. If our eye had a gamma of exactly 2 everything would be exactly as bright, so the value of 2.2 gives a slight difference in brightness with distance. I caculate that the 100m/10m ratio is about 1/1.6 instead of 1/100; the 1000m/10m ratio is about 1/2.5 instead of 1/10,000.
With a normal picture file, the pixels in the foreground are naturally brighter and also look natural because of the gamma of 2.2 in the processor. However, HDR tone mapping ignores the relationship of the pixel to its place in the composition and just works on local contrast. The result is that the distance-related brightness is lost and the image looks flat.
If I am right in all this, a tool like Paint With Light (download fom http://www.atncentral.com/download.htm) can restore the visual effect of distance.
Great bit of work which you should be congratulated on. I have used Photomatix and PS for HDR but this tutorial was still useful. Laughing my head off at Richie who says that he can create images in Photomatix that are not cartoony - then provides a link to HDR cartoons! Made my afternoon.
Brilliant, simply brilliant.
thanks ryan for this nice article.
Hey Ryan. I thought you might be interested to know that this site is ripping off your article, and mine and various other people.
Thanks, Pete! I'll be sending a DMCA takedown letter to Google soon. I'd suggest you do the same -- it's the only way to get an infringing work removed.
Great, thanks for the detailed tutorial.
Doing a bit of cleanup to try to remove words that's generating PSAs in the ol' banners... I'll be reposting other's comments cleaned up a bit. :)
Geez Pete Carr,what a kell-joy!
Pete Carr said...
Jeez being anonymous, such a kell joy :p Can't even get my keyboard warrior freak on now.
For what its worth, I do have the time to read up on all the complexities of HDR but my point was simply that if you get a result that you're happy with, then why should there be an issue about whether its 32bits or 31 or 30 or even that evil old 29? The images do have a higher dynamic range than a normal shot. My guide uses the same methodology Ryan's does using 3 RAW files to produce a single HDR image. It also explains how you can use 1 RAW file if you want to. The whole point was that its not about the technology behind it, it is about teaching people how to produce something a little bit different. How different is up to them.
Either way, people have a new fun toy to play with. Whether its via Photoshop or Photomatix people can use these techniques to enhance their photography. Can't hurt to see both sides of the coin.
Millsbury said...
Good tutorial, thanks! I shoot architecture and had given up on PS's built in HDR and have been manually layering/masking exposures. The results have been good but it is very time consuming. Looks like I was getting fooled by the bad-appearing 32-bit results, will have to revisit the techinque.
Flat, soul-less images?? Anybody who has tried to shoot architectural interiors with bright windows would kell for an easy way to make a balanced, neutral, "boring" photo that captures the complete range. This technique is certainly a step in the right direction!
Hi! I used a Canon EOS 20D with a Canon EF-S 10-22 lens. The lens is around $700, but Sigma makes a similar lens (the 10-20) for around $200 to $250 less. The Sigma lens is very competent if you get a good version of it -- myself, I tried one out and found that my copy was defective. Hence the switch to the Canon lens, which hasn't let me down once.
Personally, I shoot Canon, so I'm a bit biased when it comes to cameras. Canon cameras tend to handle digital noise better than Nikon cameras, but in all honesty, they're fairly comperable. Whichever brand you pick, know that you're stuck with that brand more or less forever, since lenses that fit Canon camers don't fit Nikon cameras, and vice versa. Since you can easily spend thousands of dollars on good lenses, you can see why you'd be motivated to stay with one brand. :)
If you're going Canon and are budget concious, try the Rebel XT. It's a very, very good camera for the money. If you have a bit more to spend, get the 30D. Personally, if I were on a tight budget, I'd get the Rebel XT without the lens (the lens that the Rebel XT comes with is pretty terrible) and then buy some good lenses to go with it.
hello!
i don't no if you go read this but i trie to do this at home and in the last step the photoshop gives me a error telling : could not complete the merge to HDR command because a command was not available.
i don't no what to do can you help me?thanks
Hi! That's a new one to me. Assuming every thing else was done right, you might want to try reinstalling your copy of Photoshop CS2.
"Photomatix is actually a very competent HDR assembler, but it's tone mapping functions tend to look a bit on the silly side. At least in my opinion"
For an image technician, that is a lot of nonsense. It is usually the idiot using the software (often they call themselves photographers even) who causes these ugly artifacts.
Unfortunately for me, most of my objects move during my long exposures, so the automatic HDR conversion doesn't work. I usually resort to the older stacking method (works in 8 or 16 bit):
1. brightest exposure goes to the bottom, darkest on top
2. copy the rgb brightness (luma) from the layer below and use it as the current layer mask
3. blur it slightly (to taste)
4. repeat with all remaining layers (all but the lowest layer have masks now)
5. manually fix the masks for objects that were moving or don't need HDR treatment
6. put an adjustment layer on top of the stack (levels or curves, as you like) to get the contrast back
7. adjust layer opacities to taste
the result is a nice rich 16 bit image with no artifacts. Here is an example from my website newyorkpanorama.com
That's a great explanation . . . and I mostly agree with all of your thoughts.
You are probably not the guy who will be willing to admit it (though you'd be good at writing the tutorial), but is it possible to achieve the "pop" with CS2?
There are a few photos I would prefer to look a little more "HDR," but would rather not buy another program (Photomatix) just for that purpose ...
hi, i didn't know how to contact you easily so i leave a comment after this post.
Thanks a lot for the tutorial, it's very helpfull, and i came to translate it to let more people try HDRI.
Let me know if there is any trouble making a translation of your material, (i know i should have asked before i actually translate your article).
http://www.virusphoto.com/2373-composer-des-images-hdr.html
Best Regards,
Xavier
Hi, Xavier! That's no problem at all -- I don't mind people making translations of this. :)
for those of us stupid people can you elaborate a little on setting temperature and tint?
Hi!
Thank you so much,
This is the exact information what I need to start with.
yellow
Great explanation on a complex subjet. Cheers!
Thanks, this is awesome. I just got a Canon 20D and have been wanting to try some HDR shots.
Nice tutorial, thanks for sharing, I got good results from the first try
thanks again
Brilliant tutorial thanks, I was previously using a trial version of photomatix and wasn't aware that Photoshop also had HDR capability. As you mentioned, the photos produced have a more realistic air about them.
Jono
Does anyone know if it's possible to rapid fire at diferent pre-set exposures? If so, How?
Ryan,
Ok, so I've answered my own question about the rapid fire exposure. HOWEVER, I have another question. I am going through all the steps to produce an HDR photo (as outlined by you), but I think I need help when it comes to the Histogram, or maybe I am doing something ealse wrong. I am a professional graphic designer so I understand photoshop, but I need to understand photo manipulation. I've purchased a PDF book written by Jack Howard entitled: "HDR: An Introduction to High Dynamic Range Photography." But I'm doing something wrong! I'm kind of throwing out an SOS if you know what I mean. Please write back.
Thanks,
Travis
P.s. I new to this whole Blog thing so I don't know if posting personal information is a good idea but here is my e-mail: travis@thedesignfirminc.com
How? This must be a very important topic, 119 comments? Now that's a community.
Very nice tutorial, thank you, Ryan. I'd like to put a link in my website or translate to portuguese, can I?
Regards,
Marcos
I think HDR is great. I am experimenting now with RAW. I have only had my XTI since January. I will be looking to your blog for lots of HDR information
Brilliant! Thanks for sharing!
Awsome man, so cool.
Hi,
thanks for the useful tutorial. I have trouble during process HDR images with CS2. Maybe you can help me...
I load the files in to the HDR merging plugin but after that I have to set the EV manually... after that I get a message:
"there is not enough dynamic range in these photos to construct a useful HDR image" what do I miss?
Thanks!
great tutorial. i was always searching for a description like this. i hope it´ll work with your tutorial. but nevertheless i think that it won´t work with my sony cyber-shot DSC-P8 with 3.2 MP...
i guess i have to buy a hdr-cam...when i´m rich.
Hello,
This is some great stuff!
But i can't seem to get the 3 pictures in 1 window..!? Can somebody please help me?
Thanks
I only have photoshop 7, does that mean I have to uninstall it and reload cs2 in order to create HDR images.
I stumbled onto this wayyyy late, but awesome! Loved every bit. I too perfer PS HDR over everything else, so thanks for the primer!
good tips for me..I really like to design using photoshop..
These comments have been invaluable to me as is this whole site. I thank you for your comment.
wow... this is the best HDR tutor i have seen it so far.
thanks
your HDR tutorial was wonderful.
but i have one question. if i want to do panoramas photo which require to HDR a few photos with all same level of settings during the process.
is there any methods in photoshop that do one and apply to the next photos.
cheers
As an overview, I think HDR is not about having monitors or materials that show the whole dynamic range as is (as I don't think the eye could see that much information in one go, that is what the iris is for). It is more about compressing the full dynamic range into something that is viewable and therefore obtaining detail in all areas of the image.
To another previous comment regarding the inverse square law.
You have your law correct, however you have made an incorrecet assumption when talking about objects closer or further away (I think your example was 10m and 100m).
The light is not actually coming from the objects, it is coming from the sun. When you look at the difference between 10m and even 5000m, they are still very small relative to the millions of kilometres the light has already travelled. This is why things appear to have a relatively similar brightness.
The slight dulling effect from distant objects is actually caused by refraction and scattering of light due to dust particles in the atmosphere.
An additional comment regarding the bracketing on Canon cameras; You can get more than three exposure brackets, at least on 1D or 1Ds series cameras, but only by using personal functions which must be set using the computer.
Interesting post, and I look forward to trying some of the ideas.
To the anonymous guy who commented on the inverse square law:
I don't see how that law really applies here. An equally lit object 100 miles away should be just as bright as one 10 feet away, if you ignore the effects of impurities in the atmosphere.
Sure the *quantity* of light is smaller at 100 miles, but so is the area the object occupies on your retina. So the brightness should be the same, no?
wow! great post! thx a lot!
i can't belive it!!!! there are still people who can explain on this earth!!! thanks a lot for your detailed and exact explanation!!!! just one little thing ;-) voilà is written like this....
thank you soooo much
christian from switzerland
Anyone gang-operating 3 still cameras (one for each bracket)for HDR?
No need then for a tripod.
I don't think that would work as you planned. First off, you would end up with parallax -- so the only kind of photos you could do using this method were shots of things far away. Second, you'd still need a tripod, as aligning the photos would be somewhat difficult, otherwise (and likely still won't be perfect, even with the tripod). The only advantage is that you could capture moving targets with this method, so long as they were moving very far away and you had a method to exactly synchronize the firing of all 3 camera shutters. :)
Dear Ryan I have photoshop Vl does that matter ? Very few articles catch my eyes but this one I read to the end , thank you I will try as soon as you tell me . If I don't have what I need is there a place where I can download the software for free .
Hi! Unfornately, old versions (pre CS2) don't do HDR -- you have to have a newer version. And no, there is no way to get it for free.
it's possible to make hdri images even without photoshop - try to google for request like "hdri tutroials" "hdri software for photos"
And Great Respect to author!!!!
---
Sorry for my english. My native language is russian =)
Pete and Ryan really are the two sides of the HDR coin. I personally think that there's room for both philosophies. Why, you could produce and HDR image in Photoshop and Photomatrix using the exact same bracketed image, and come out with two separate but amazing results. These are exciting times in photography, and we're lucky to be present at the dawn of a new age in technology, and simply looking at the world. Hell, regular film photography is still valid, and why can't people do everything. I shoot with a Nikon D80, a Crown Graphic 4 x 5, an old Minolta 35mm, and even my cell phone when I feel like it. Have fun with it. That's all that matters.
And the "viola" thing. I think that you were ironically misspelling it as I have seen done before. A lot of people seem to be missing the joke. But then again, maybe it was accidental. Great article, by the way.
Excellent post.
I quite like the output of photomatix - sometimes - but it is really good to see something which generates more "natural" HDR for those times when that is just what you want.
Well done for getting the information across in such a straightforward manner.
Thank you once again. I tried this for the first time today and the end result was amazing.
One other thing should be noted. You can merge different exposures to somewhat better effect in some cases simply by layering two or more bracketed exposures in one photoshop file and using masks. I do this on occasion with very tough lighting situations when I am using chrome film. The exposure latitude simply isn't wide enough for very contrasty scenes so I will expose for highlights and shadows and merge them. --Andrew New York City Location & Fine Art Photographer
Is there a way to create HDR images by changing the exposure settings in an imaging program to say -3, -2, -1, 0, +1, +2, +3 and then doing an HDR merge instead of having to shoot 7 pictures first? Seems a lot simpler.
John F.
Hai Ryan,
thx for sharing this tips with me,..but how about if I had only one photo? I just found this video on you tube shows how he could manipulate single photo become HDR photo, what do you think about that?
this is the link of that video
http://denmuel.blogspot.com/2007/08/photoshop-hdr-effect.html
and you might wanna take a look antoher video,..
http://denmuel.blogspot.com/2007/08/how-to-create-hdr-photos-with-photoshop.html
i think he uses the same technique.
thx
denmuel
great post anyway :)
As I explained in the tutorial, it is not possible to create an HDR image with only one image file, unless you happen to own a $15,000 camera that has an extraordinarily wide dynamic range. The entire point of taking several photos is to capture more light information than your camera's sensor can capture in one go. If you only capture one shot, then you are by nature taking a non-HDR photo. You can apply all the photoshop filters to it that you want or run it through photomatix, but you'll just be applying manipulations to a non-HDR image.
HDR Tutorial:
http://journals.fotki.com/GBENZ/creating-hdr/
Sample images:
http://gbenz.fotki.com/twin-cities/
hey, I cant click on the automate-- thing like you wrote. In the files. What can I do? :/
"in the near future I'm going to post a tutorial about just what I meant by "use your own toning skills". Digitally toning (i.e. color correcting) a photograph is quite a process, but most of the interesting stuff about it is easy to digest and learn, and can often be done quickly once you're practiced."
Did you ever do one? I'm interested in this HDR process, but can't afford a program like Photomatix, being a poor student. ;)
Also, I live in Lincoln too. It was a nice surprise to find that out about you!
Thank you very much for this information.
No offense, but do photographs really have to look realistic? Isn't the interpretation of how the image is produced part of the photographic process as well? As far as I understand it, it's much more than simply subject and framing. Personally, I enjoy "thinking outside the box". If you think photography always needs to produce "realistic" images, then where do photograms, false coloring, and poloroid transfers come in? My opinion is that photography is simply a method of creating an image that is a work of art. That image may be realistic, or it may be completely different from what the scene really looked like. The point is that it's up to the photographer to decide. In some scenes, the "cartoony" look really works. In others, a more realistic approach might work better. It depends on the subject matter and what effect the photographer wants to create. I agree that the "halos" around objects that can be created by Photomatix are hardly ever desired, but usually they are a result of inexperience by the user. However, the super-saturated "pop" of some Photomatix-processed images can be desirable, especially if it enhances the particular image. I try to think outside the box with my photography. To me my camera is my paintbrush and my computer is my canvas. As long as the end result is pleasing to the eye and creates the mood I want, it doesn't matter how realistic it looks.
That image may be realistic, or it may be completely different from what the scene really looked like. The point is that it's up to the photographer to decide. In some scenes, the "cartoony" look really works.
Posted By Blackpool Hotels
Date: 19th September 2007
There's no way to get Photoshop CS2 for free? Ya'll haven't been on the Internet long enough. ;) Software is information, and information is always free, as it should be. You just need to find the right sites. Cheers.
Thats a great tutorial. I tried it out and I am very impressed with the result. I will be using this method more often, though I think Photomatix as its good points too.
Thanks alot!!!
Jonathan.
Hey, I have a quick question for anybody out there who can answer it..
If I'm trying to take the 3 or more pictures all at different exposures and I am outside on a sunny day, the lower exposure shots are not turning out. Any way to fix this?
thats amazing. thanks for the guide, seriously. i just ordered my canon rebel xti, should be here in a few days. really looking forward to using your guide
thanks again
Thanks Ryan for your tutorial that I had made my first HDR. But I had some problems.
First, the PSCS2 couldn't open the 3 raw files shot with Nikon D80, so I had to shoot another 3 jpeg files again. Following your tutorial, the HDR image came out.
Second, the image couldn't be saved as jpeg format after downsample from 16 bit to 8 bit. So I saved it as tif format. Please tell me why?
Thanks again!
I simply wanted to post a link to a site that might be f use and a table of cameras that does autobracketing as well.
http://www.hdrlabs.com/tools/autobracketing.html
and then the site as a whole as well.
http://www.hdrlabs.com
Karl
Thanks for the tutorial, though I think I enjoyed reading the comments more than the actual blog post. I have done a few HDRs that I would consider successful so far, both using photomatix and photoshop CS3. I agree that CS3 is more natural-looking, however sometimes more artsy-looking photos work in certain situations.
For those of you whos camera's can't shoot in RAW, you can definitely do HDR photography, but a JPG won't retain as much information as a RAW file, so my suggestion is to shoot more photos. If you normally would take 3 bracketed shots in RAW, why not take 7 JPGS, eventually you should cover all the needed information and tone.
I know there's a LOT of discussion on this subject (see the flickr groups on HDR) but you can't create a TRUE HDR with 1 RAW and then taking different exposures from it. True, it will have more information and detail in it than a JPG, but still not as much as 3 or more RAW files. Usually it's called tonemapping, and even if it resembles an HDR, there will be less data in the details, but sometimes it is effective to get more information out of a singe RAW file, especially if your subject is moving and you can't bracket. But if you CAN, the more shots the better to get as much range and detail as possible.
Thanks again for sharing your information and ideas everyone!
Don't forget that adobe CS3 has a 30 day demo for free! There seems to be no limitations, so if you can't afford to buy it, at least you can use it for a month. :)
Thanks for this wonderful blog post! It makes HDR seem not so intimidating :).I'm going to try it now.
Hey Ryan, thanks for this tutorial. I'm an avid photomatix user but the PS technique you demonstrate works well too. I sometimes use the old-fashioned method of layering in PS if I want it to look more real. Your photos are great and I love seeing Nebraska imagery since my dad is from Alma.
Take care
Thank you ... verrrry easy to follow and very helpful! :)
A question: Many HDRI pics will have moving people or objects in them such as a car. How does one get 3 or more pictures of the same thing at different exposures?
I think you have a neat and informative tutorial. Every photo done in HDR seems to require it's own individual care and attention. It takes a lot more work to create a great HDR image than it does with normal photography, but I think the end result can definitely be worth it. With the right editing and effects, you can get a clarity, depth and contrast that really makes your photos pop.
thank god someone took the time to set the world right on what hdr photography is about. i was kinda getting tired of all those over-haloed unrealistic comic-booky photographs over the photoblogosphere and flickr that look like as they were sitting in rain for the past two hours and rest of the crowd ooh-aah-ing over them. maybe now we will see some real hdr photography.
VERY COOL!!
VERY VERY COOL!
It definitely is an interesting article!
But I'm with Ryan on this one. Through Photoshop you can achieve a lot cleaner and "realistic" looking images than through photomatix.
Well, I shouldn't even say that. It is up to the skill of each individual as you can tweak the image any way you want.
If Pete wants plasticy looking images that are dramatic but kind of make you go "what's wrong with it", hey - his choice.
I prefer the well-balanced and rich images that are simply pleasant to look at.
Pete's images are awesome in their angles and motives, but the color and contrast simply throw me off.
Great post, just what I was looking for. I noticed way back in the comments a guy called Richie said "My photos are all done with Photomatix and come out quite realistically." Well I looked at the link to his Flickr site and all his HDR shots come out looking cartoon-y to me, more like an "artist's impression" than "the real thing". They all display that exact "bucket of sturated paint" style that you mentioned. Fine if that's the effect you're after, I suppose.
Amazing... this is what im looking for. Most of my picture i just adjust for color, contrast and curve in photoshop. But you show me a different way how to use photoshop.
Great Post :)
Has the article "use your own toning skills" been posted ?
Hi, I have just read this article and found it great. I an amateur photographer and have been wanting to try this for a while.
The only problem is, I cant open RAW images in Photoshop CS2!!!
Am i right in thinking that the multiple images you take, HAVE to be in RAW mode???
Great article. I've been trying to play around with hdr for ages with no luck. I've not moved on to using books to get a better grip on mastering photoshop
Excellent article - thanks
Ryan, thank you so much for your work - I am new in HDR less than a week and your tutorial finally explained me all!
with regards from Prague,
Peter.
excellent post, thank you!
Awesome, thanks so much!
Wow, that was an incredibly helpful tutorial - thank you so much for taking the time and sharing your wisdom with us!
Well that does it....
Now I have to play around with HDR since I really like the output you are getting with that.
Thanks for a great tutorial :-)
--peter
wow that was an excellent HDR. i tried doing HDR before but cudnt get it right. but aftr following your tutorial im ready to start my HDR sessions! :D
thnx man
Perfect Post, thank you for your hard work!
I'm way late. Just found this. I've always wondered what the difference is in the HDR images you describe and the HDR scans from Silverfast. I know there is more information in those scans than in 48 bit color scans; does this have anything to do with dynamic range?
I've scanned a number of images in HDR and find that the lighter, higher tone, images do well, but the lower, darker images have a lot of noise when treated as a raw file.
Are they completely different? I'm an avid hobbiest, not a pro.
I think the biggest misconception is that many people don't give the examples of the 3 or 5 images that you create the HDR from.
http://luxal.dachary.org/webhdr/example.shtml has a good example. You see 5 images, at the top, that show what you start out with.
The photos to the right are darker, and therefore you see a lot more detail in the "light areas". The photos to the left show more detail in the "dark areas".
The HDR (at the bottom of the page) shows detail in all areas of the image. So, you start off with an HDR image that, as a whole, has the best overall detail in all parts of the image.
From there, you can keep it "natural", do a little histogram or tone work, or you can really play with it and get some images that have a lot more "pop". Its your choice.
RAW works better than JPEG capture, but either way, you are going to get a better HDR than just one exposure.
I have a Pentax K10D. Great camera and under $600. It has auto-bracketing of 3 or 5 images, which make it really easy for me to merge into HDRs.
Great tutorial, BTW. I've had CS2 for over a year, and didn't know that I could do this. I had been using FDRTools.
Thanks so much for that - just googled cs2 hdr tutorial and there you were. Great stuff. Can't figure out raw and cs2 (followed the download instructions but nothing) but I will try this still.
Thanks again,
@ritchie, Some of the worst hdr I have ever seen.
Awesome tutotials!
I love Photomatix. I always been interested in HDR but used to do it with Adobe PS before. I just download Photomatix free trial today.
Well, I got a question:
Can we make three fotos with different exposures from one JPEG (or RAW) file with that free trial version? If yes, how?
Thanks so much cos I have no idea. Thanks. Cheers.
Jen.
This was a great post in 101 Hight Dynamic Range. Now I know how to use it. Thanks! Bernie
I like posts that give real detail on how to do something and I've been interested in HDR for some time now - perhaps I can make a little contribution as you talk about using a cable release. In these circumstances I try to use mirror lock and a remote release
Happy shooting
John rocha
excellent post
Great post. I'm going to try some HDR this wekend and post to my blog. www.reflectedmemories.blogspot.com
Please check in to see how I'm doing.
Thanks ~ Tina
Thank you so much! Great post=)
Anonymous said: When our eyes were evolving, if they just went with the inverse square law,things more than a few metres away would be too dim to see: no good if hunting and dangerous if being hunted. lol...yet another law that just doesnt match up with the evolution theory...theres also that pesky 2nd law of thermodynamics too...I bet even Charles Darwin believes in God...NOW.
thank you VERY MUCH, all these informations are just great!!!
thank you for posting this blog!!
Thank you for sharing this I will give it a try...
Again Great tutorial
kep them comming man!!!
>one day HDR monitors will be commonplace
That day HDR file formats (like HD Photo / JPEG XR) and HDR cameras hopefully will be common place, too :-)
HI - considering a HDR photo has a required range of 30,000:1 and there are no monitors with this capability (with the exception of one @ $49,000 dollars - how is this a HDR image? let alone how are you viewing it if it is? A HDR image must have certain qualities from what I understand of a HDR photo - that being a specified range from pure black to pure white and all inbetween.
What I see of most claimed HDR's could be acheived with a ND filter of some sort. Or for that matter, two simple exposures sandwiched, one for the high tones and one for the low - this still wouldn't be considered a true HDR image or photo unless it met the HDR crytieria of a 10 to 11 ev span. Rather these images are more a possible HDR simulation of a HDR had it been created or viewed on a monitor capable of producing HDR quality.
Granted the current HDR image simulation techniques do achieve a rather interesting look. However, fooling oneself into thinking this is a HDR or that they have creted a HDR photo or digital image with out ever having actually seen one is cutting oneself short and others short. Most claimed digital HDRs I've seen,for one, can't be viewed as a HDR (very important for a HDR is to be able to view the image as a HDR), and secondly, 90% do not meet HDR cryteria of range, therefore, they are not true HDR's.
Wouldn't you agree?
Have you checked to see that your sample that you are claiming to be a HDR above has met HDR cryteria, even if you had the monitor that could produce a 30,000:1 ratio to view it on?
If so, out of interest of technique, may i ask how you checked it for the requirements of a HDR image?
Ah, if only you'd read the entire article instead of hammering reply on paragraph two, you'd realize I'd already made the exact point that you just made. Can't blame you, though; I'm guilty of such things too, from time to time.
I encourage (in the article) people to save the 32 bit floating point file for the day when capable monitors are more common, and I do explain the difference between this and tone mapping in the article. And yes, when you assemble a large number of images into one 32 bit floating point HDR file, you are indeed creating a high dynamic range image.
Hi ;)
Thank you for this Tutorial.
Helped me very much!
Greetings,
Isabelle
cool man i'm really goin to try it.keep up the good work
Post a Comment